Subprocess Leadtime
Here you have the opportunity to define a custom subprocess by choosing any start or end activity you want.
Sometimes, the regular leadtime calculated in a process from the start of a process to its end is not the most useful. Typically, every variation of all cases is included.
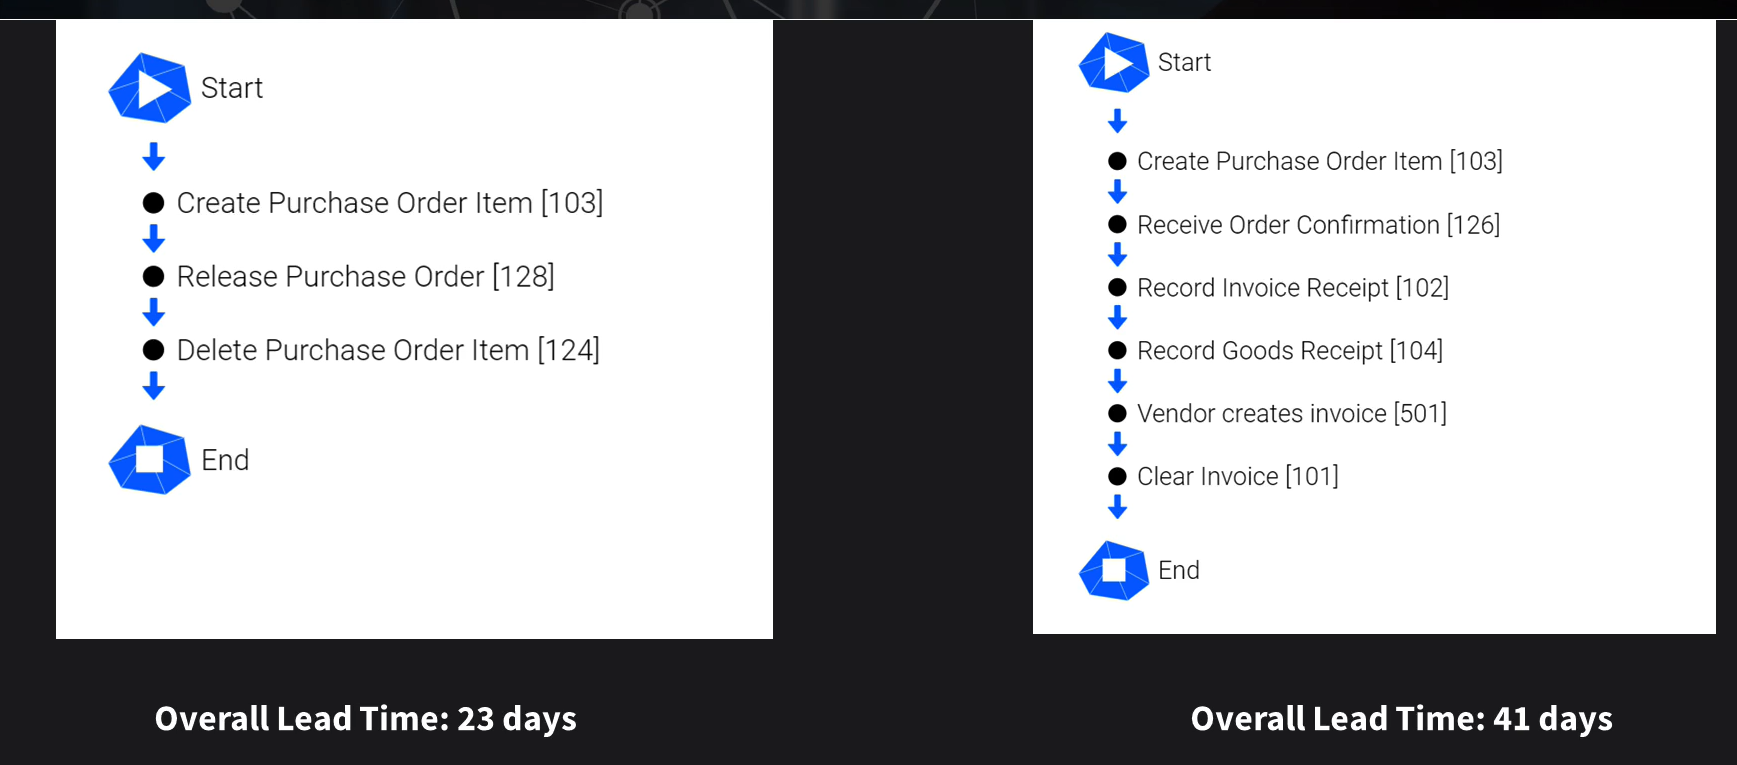
Use Case 1 - Premature Undesired End of Process
Sometimes processes end before fully completing the ideal flow - like an order being cancelled instead of going on to delivery and payment. The leadtime might be shorter here, but it is not the ideal scenario, so we may not want to include that variation in a particular analysis. We want to shorten the optimal process that ends in payment.

Use Case 2 - Same Overall Leadtime but Different Optimizations
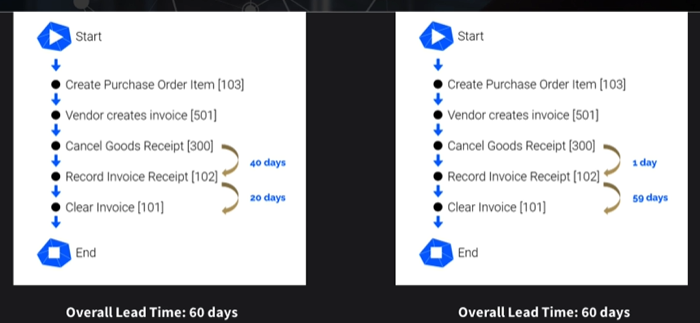
Another example is when two cases finish within the same time, but their leadtimes between individual steps are quite different.
Here in the first example, the case needed 40 days between Cancel Goods Receipt and Record Invoice Receipt and another 20 days until Clear Invoice.
In the second example the case needed only one day to go from Cancel Goods Receipt to Record Invoice Receipt but a full 59 days until the Clear Invoice activity was completed.

While the steps were the same and the overall lead time was 60 days for both, each of these cases are very different and indicate a need for different optimizations. These differences would not have been detected looking at only the overall leadtime of 60 days.
To configure partial processes follow these steps:
-
Open the Subprocess tab.
-
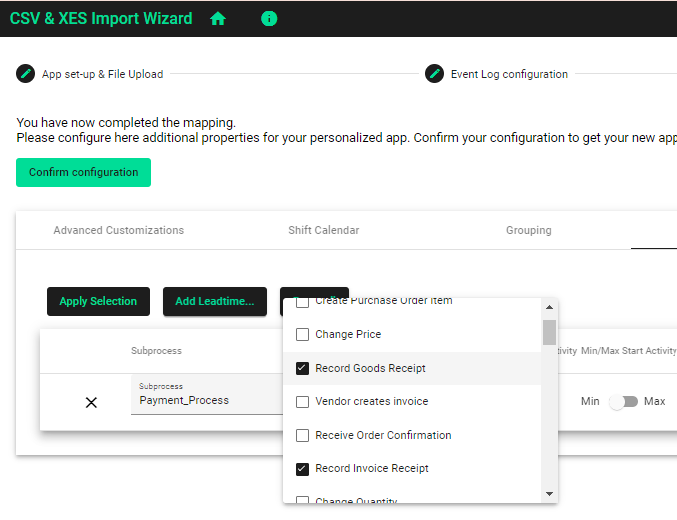
Click on the Add Leadtime... button
-
Give your subprocess a name in the Qualifier field.
-
Select a start and end activity in the dropdowns.
- You can also select multiple start or end activities if you want to have more variations included. Simply select multiple checkboxes in the dropdowns.
- When you have multiple start or end activities any one of the start activities could trigger the start of your subprocess or its end.

Subprocess Multiple Start Activities - Looking at Use Case 1 above, by selecting Clear Invoice as our end activity we will avoid including the undesirable short case variants where the process finished due to a cancellation.
-
The checkbox IncludeStartActivity allows you to specify if you want to include the duration of this activity in the subprocess leadtime calculation.
- Checking this box will use the activity's StartTimestamp as the starting point.
- If it is unchecked, and the activity is not included, then the activity's EndTimestamp will be the starting point for the subprocess.
- This is only relevant if your data includes the time duration for each activity. If you only use a single StartAndEndTimestamp, then this option does not matter.
-
The option MinmaxStartActivity is only relevant if the activity is repeated or if you select multiple start or end activities.
- Here we specify whether the first occurrence of the set of activities (min start activity) or the last occurrence (max start activity) will trigger the start of the leadtime.
- In the picture above, where we have multiple start activities, we have selected that either Record Invoice Receipt or Record Goods Receipt could start the process.
- For cases that had only one of these activities, regardless of which, that activity would then be the start of the timing of the subprocess.
- Our subprocess example above had both of these activities. Let's assume our case went from Record Goods Receipt to Record Invoice Receipt. With the option set to Min, then Record Goods Receipt would trigger the start of the leadtime since it was the first activity to occur. Had we selected Max, then the Record Invoice Receipt would have triggered the leadtime calculation, since it had occurred last.
-
TargetTime & TargetTimeOperator
- Set a goal that you want your subprocess time to reach.
- Example: You want the process to finish in under 30 days, then enter 30 in the Target Time and
<=as the Operator.
-
You can add multiple leadtime lines in this table to identify various subprocess examples.
-
You can delete subprocesses by clicking on the "x" symbol on the right side.
-
Click the "Reset all" button to erase everything and start over.
-
When the subprocesses are defined click on the "Apply Selection" button to confirm.

More information on how to Define Subprocesses can be found in the Data Engineer Guide.