Application Overview
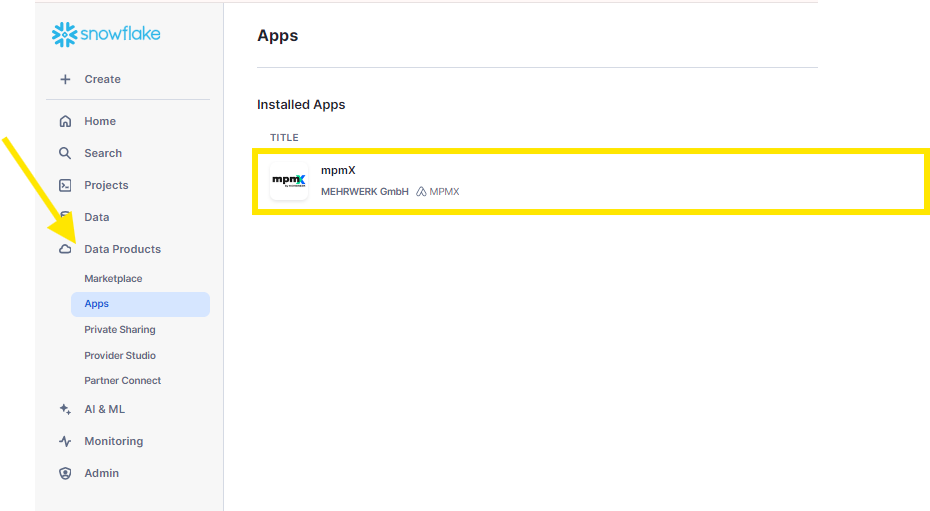
Upon first login to Snowflake you can find your apps under the Data Products / Apps menu. Then click on the "mpmX" app to open it.
Welcome Page
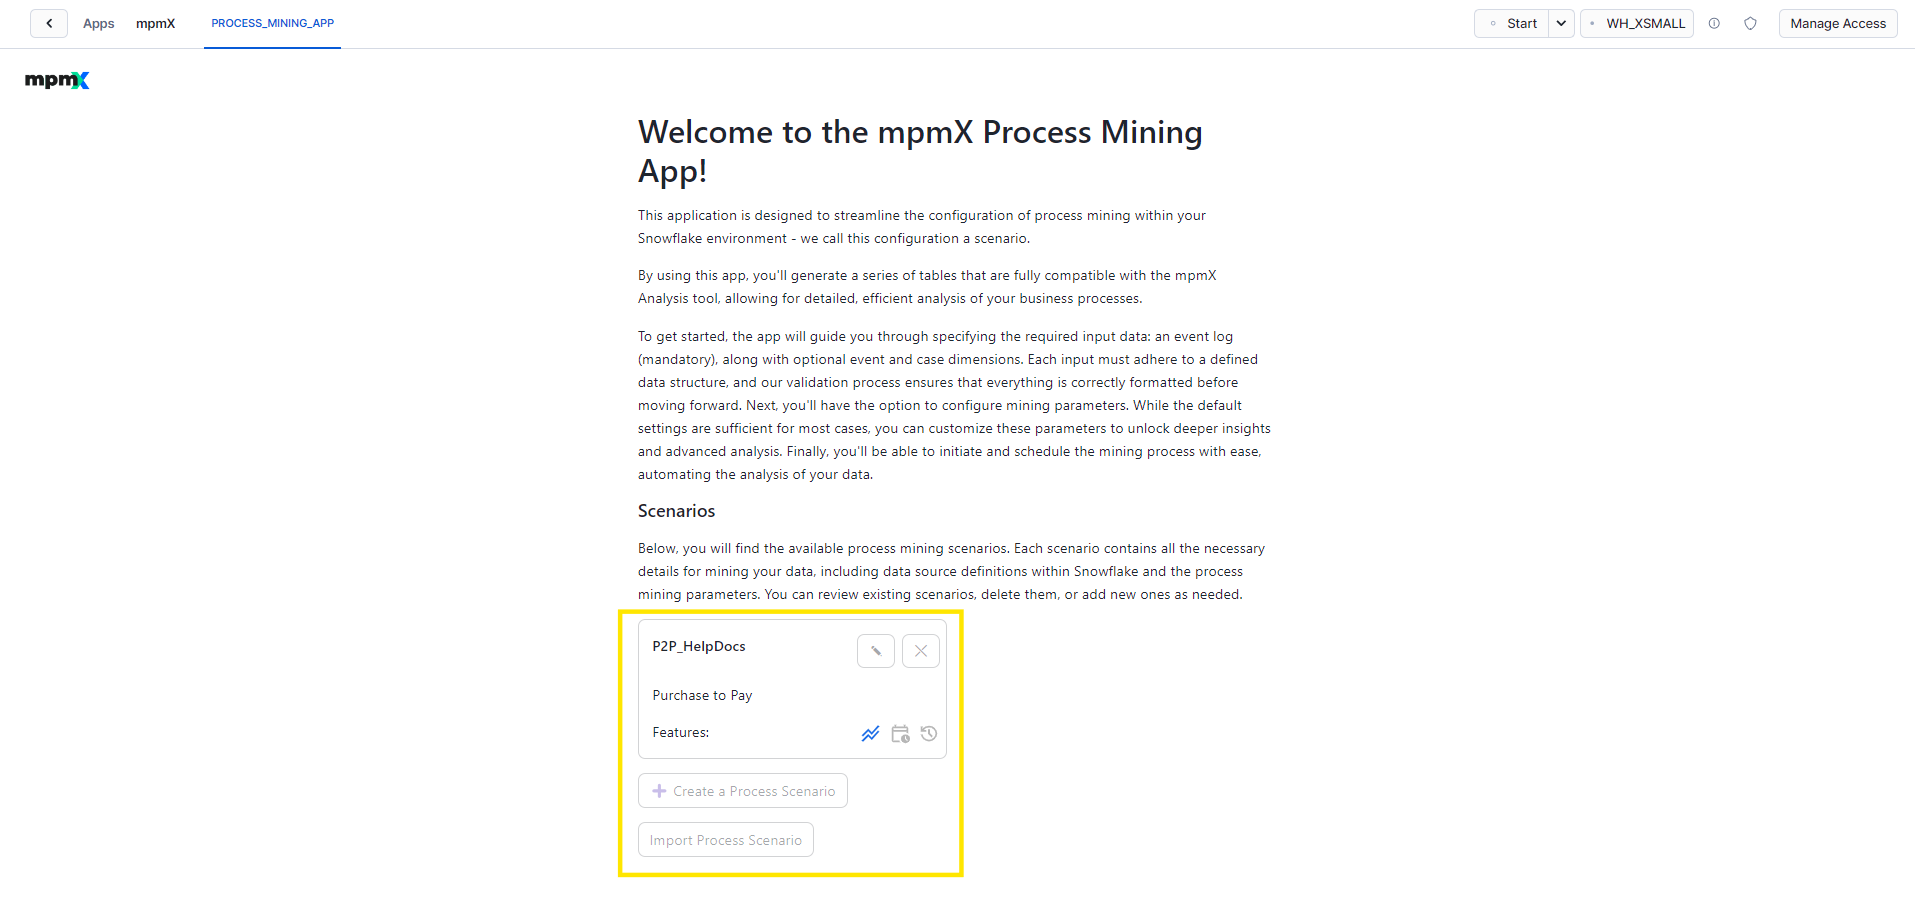
The Snowflake Process Mining App starts with the Welcome page. Here you can view all the available process mining scenarios, create new process scenarios or edit and delete existing ones. Each scenario contains all the necessary details for mining your data, including data source definitions within Snowflake and the process mining parameters. You can review and edit existing scenarios, delete them, or add new ones as needed.
The "✎" button takes you to the Data Source screen, where you can start editing an existing Process Scenario.
The "⛌" button allows you to delete an existing Process Scenario. You must to confirm your intention.
Create a Process Scenario
The "➕ Create a Process Scenario" button takes you to a new screen.
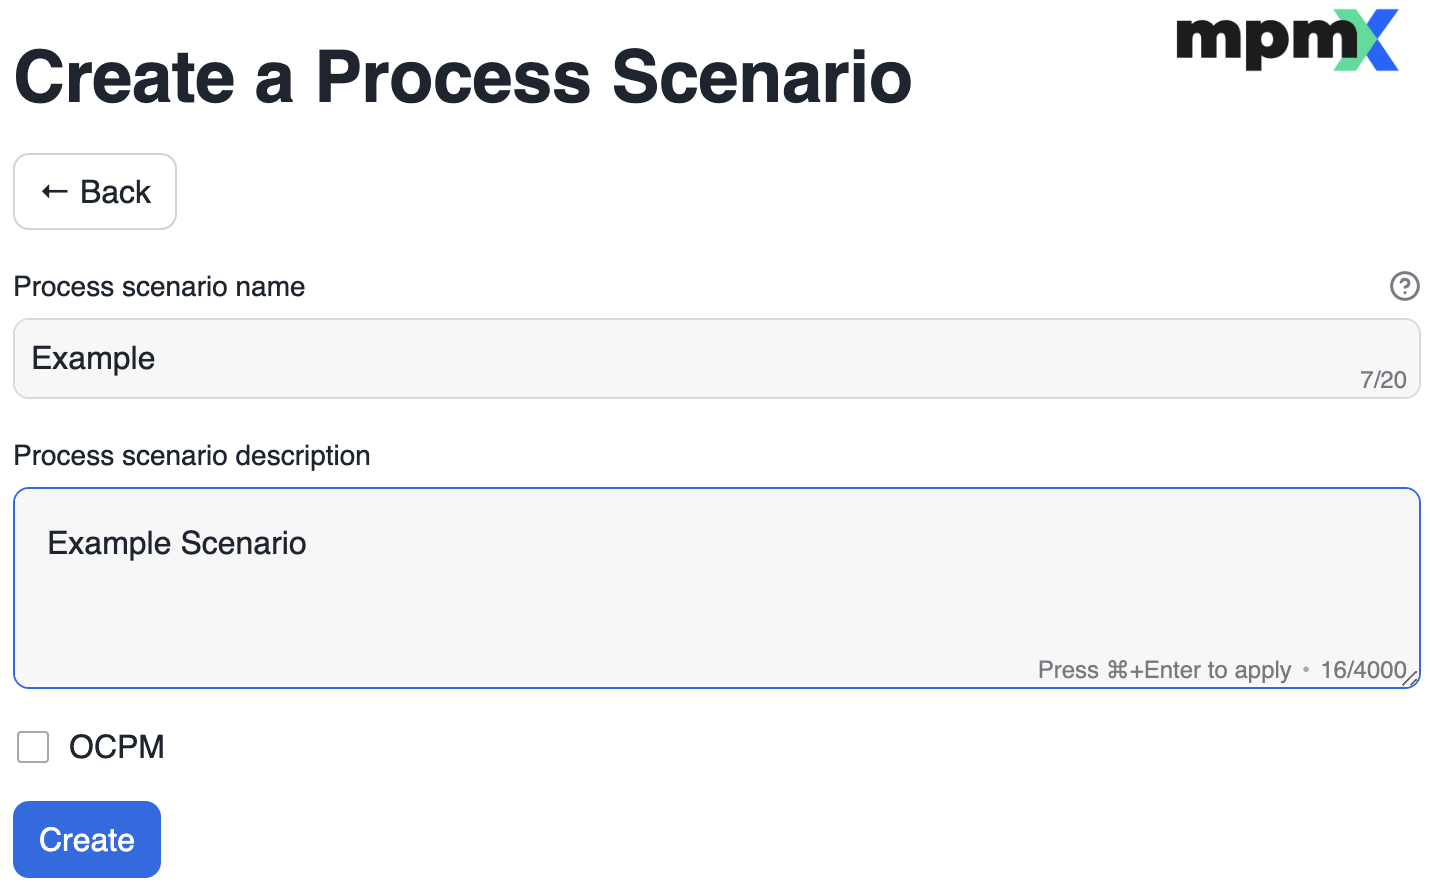
Here you enter the Process scenario name and Process scenario description of the new Process Scenario.
You can also decide whether you want to create an OCPM Process Scenario and whether you want to Enable Time Travel.
Data Sources Tab
Data sources are the starting point for process mining.
Each data source must adhere to a defined data structure, and our validation process ensures that everything is formatted correctly before moving forward.
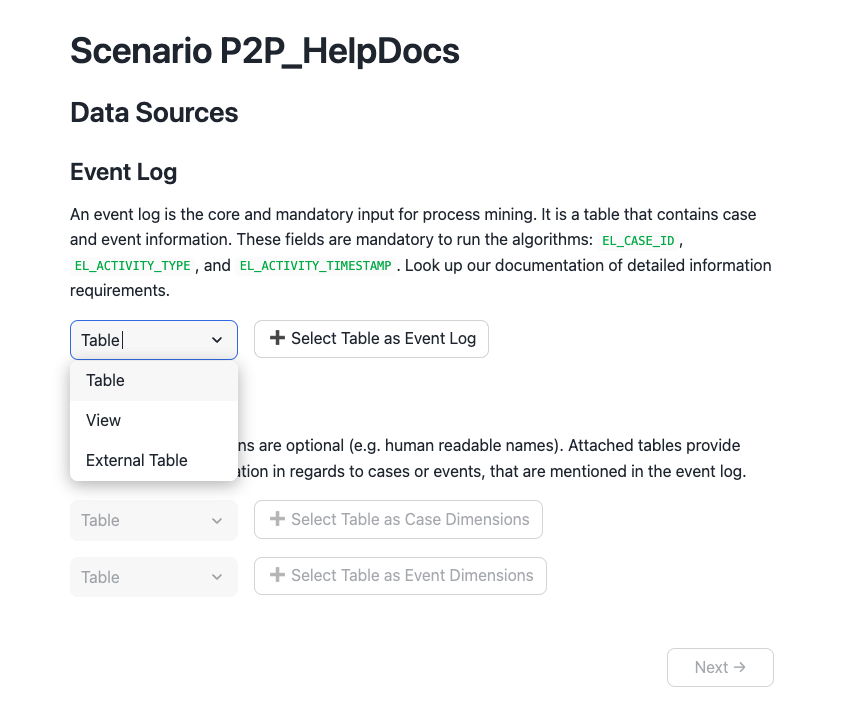
Select an Event Log
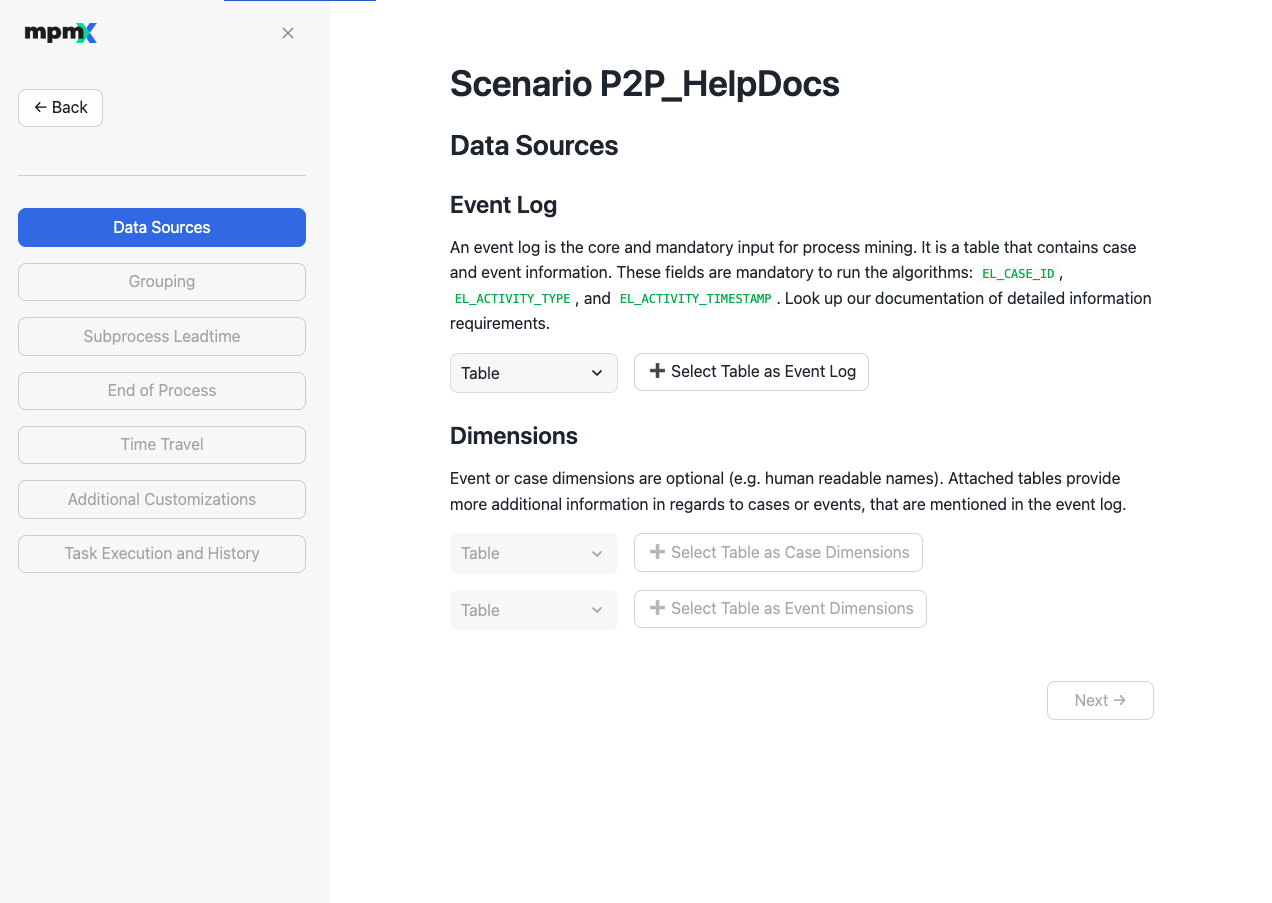
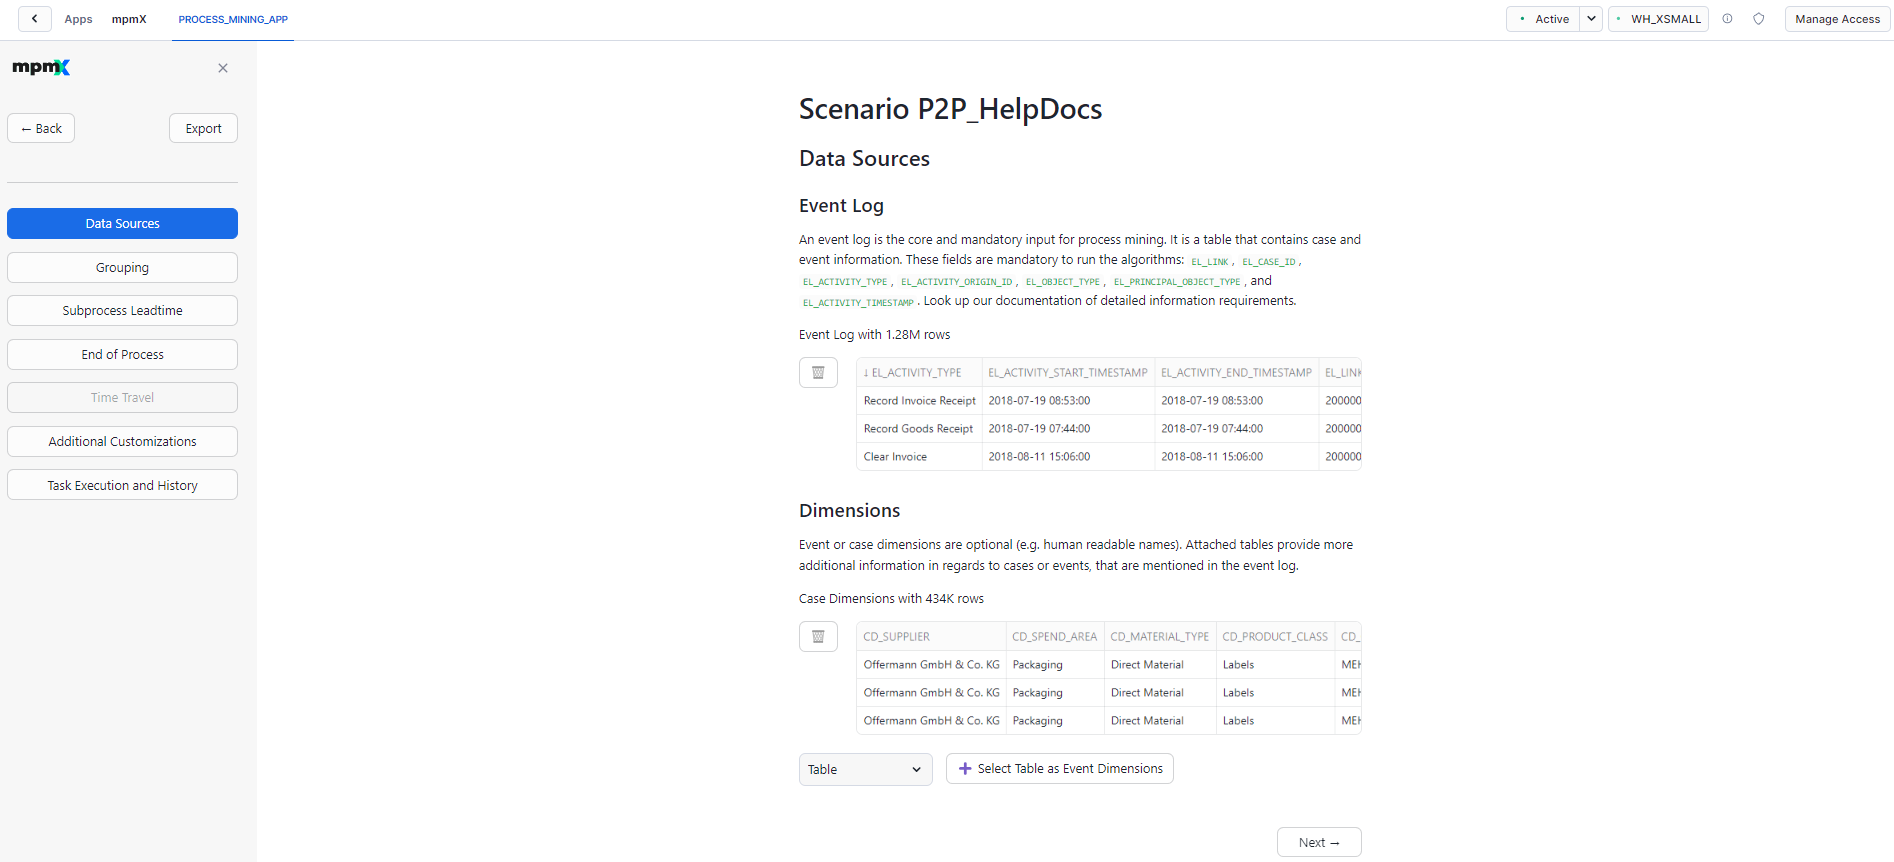
An event log is the central and mandatory input for process mining. It is a table that contains case and event information. To further enrich the event log with your domain specific data, you can also add additional Case and Event Dimensions.
The "➕ Select Table as Event Log" button allows you to reference a table that you can access as an event log. You can change the type of event log before selecting a reference. The dropdown options are Table, View, or External Table. Support for other types, such as Iceberg tables, will be added here soon.
Click the "🗑️" button to remove an existing reference which the allows the selection of a different Event Log.
Dimensions
The "➕ Select Table as Case Dimensions" and "➕ Select Table as Event Dimensions" buttons allow you to reference tables that you can access as additional case and event dimensions respectively. You can change the type of event log before selecting a reference. The dropdown options are Table, View, or External Table. Support for other types, such as Iceberg tables, will be added here soon.
Click the "🗑️" button to remove an existing reference which then allows the selection of a different Case and Event Dimensions.
Grouping Tab
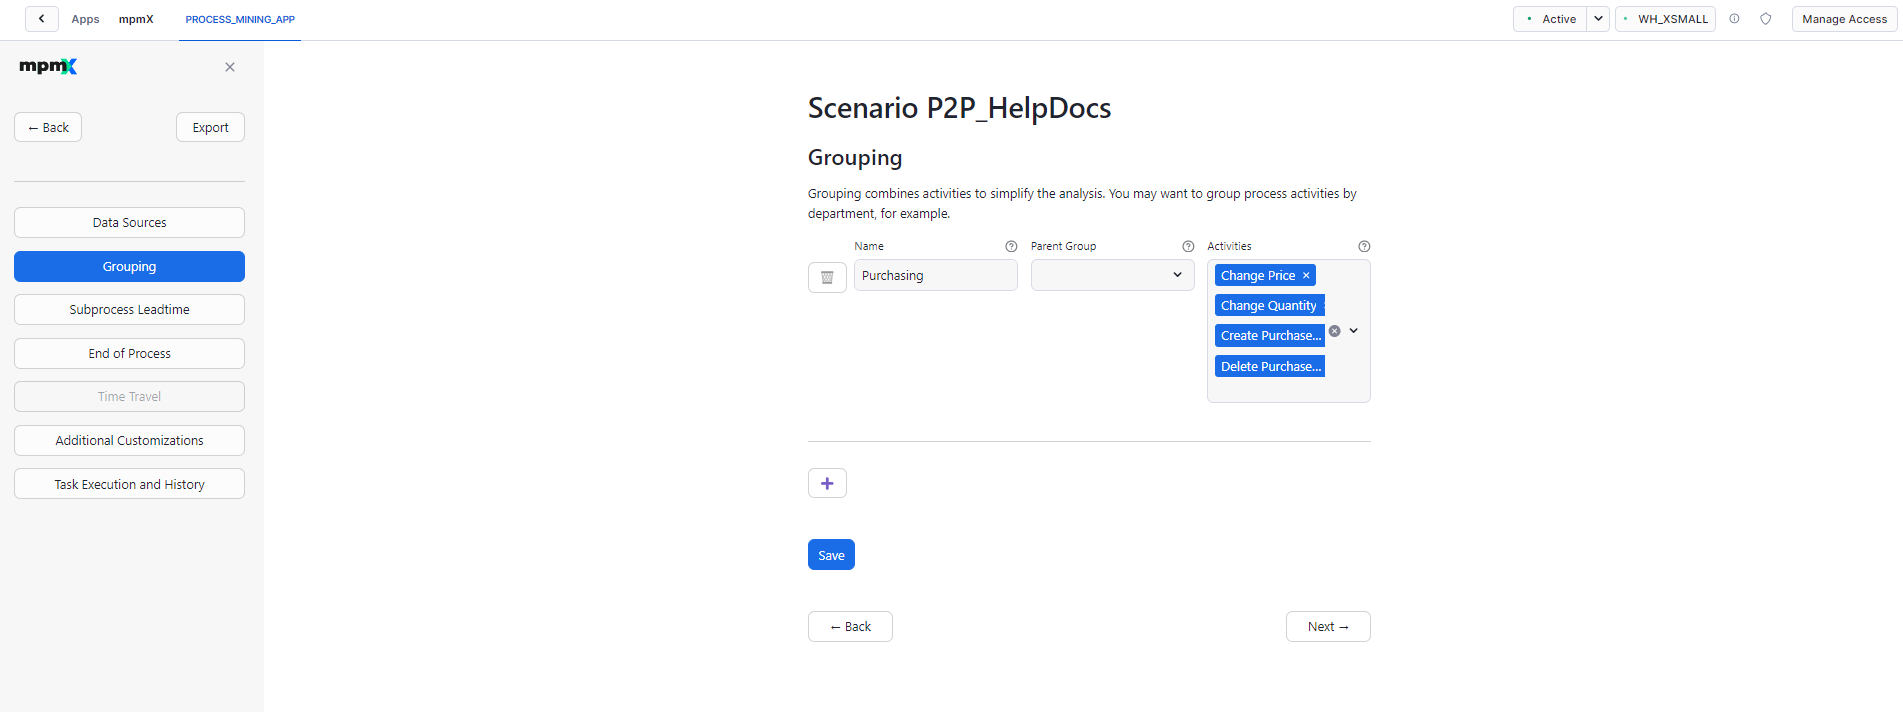
By defining groups, you can combine related activities to get a better overview of your processes in the process analyzer. Groups can be defined in a hierarchy by configuring one group as the parent of another.
- For more information see Process Analyzer Grouping
To add a new group, click the "➕" button.
Fill out the Name field with the name of the group.
The Parent Group field lets you define a parent group. Parent groups are optional. A group cannot reference itself as its parent.
Use the Activities field to define which activities belong to your group.
- Click on the "˅" to open a list of activities to choose from.
- Select as many activities as you like, but each activity can only belong to one group.
- Click the "X" next to an activity name to delete it.
To edit an existing group, simply change the field values as required.
To delete an existing group, click the "🗑️" button next to the group.
Click the blue "Save" button when you are finished.
Subprocess Leadtime Tab

Define subprocesses to calculate lead times and other time-related measures are calculated for partial processes.
To understand why this is useful, take a look at the Subprocess Leadtime » Use Cases.
Add a New Subprocess
To add a new subprocess, click the "➕" button and fill out the fields appropriately.
The Subprocess field lets you define a name for your subprocess.
Use the Start Activity field to select all activities that mark the start of the subprocess.
The Include Start Activity check mark below defines if the duration of the activity will be included in or excluded from the calculated lead time.
Sometimes you may have more than one activity marked as the Start Activity show up in a process variant - either because two different start activities appear or a single start activity is repeated. The Min/Max Start Activity field is then used to define if the first or last matching activity will be used for lead time calculation. Min uses the first matching activity (resulting in a longer process leadtime), while Max uses the last matching activity (resulting in a shorter process leadtime).
Use the End Activity field to select all activities that mark the end of the subprocess.
The Include End Activity check mark below defines, if the duration of the activity will be included in or excluded from the calculated lead time.
By configuring the Min/Max End Activity field for the End Activitiy you can define if the first or last matching activity will be used for lead time calculation. here the resulting impact is opposite that for the Start Activity. Min uses the first matching activity (resulting in a shorter subprocess leadtime), Max uses the last matching activity (resulting in a longer subprocess leadtime).
The Target Time [d] and Target Time Operator fields define the desired lead time for the subprocess. They are used to calculated if the lead time is missed.
Don't forget to "Save" your changes.
End of Process Tab

By default, the mpmX app shows leadtimes and other information from an average of all cases, but this can sometimes be misleading.
- For example, cases that are not finished will have shorter leadtimes just because they have not reached the end.
- The number of process variants (specific path that each case takes) will be greater if you include both open and closed cases, than if you only counted closed cases.
On the End of Process screen you can define when a process is considered to be completed.
- If the End of process condition is set to None, all processes are considered to be completed.
- Selecting using Activity to then select an activity which marks a process as completed.
- Select using Custom Field to define more complex conditions.
- On the left, you can define which field of the activity log should be used.
- In the middle select the appropriate operator (= or IN).
- On the right, define the value (in case of =) or the comma-separated list of values which mark a process as completed.
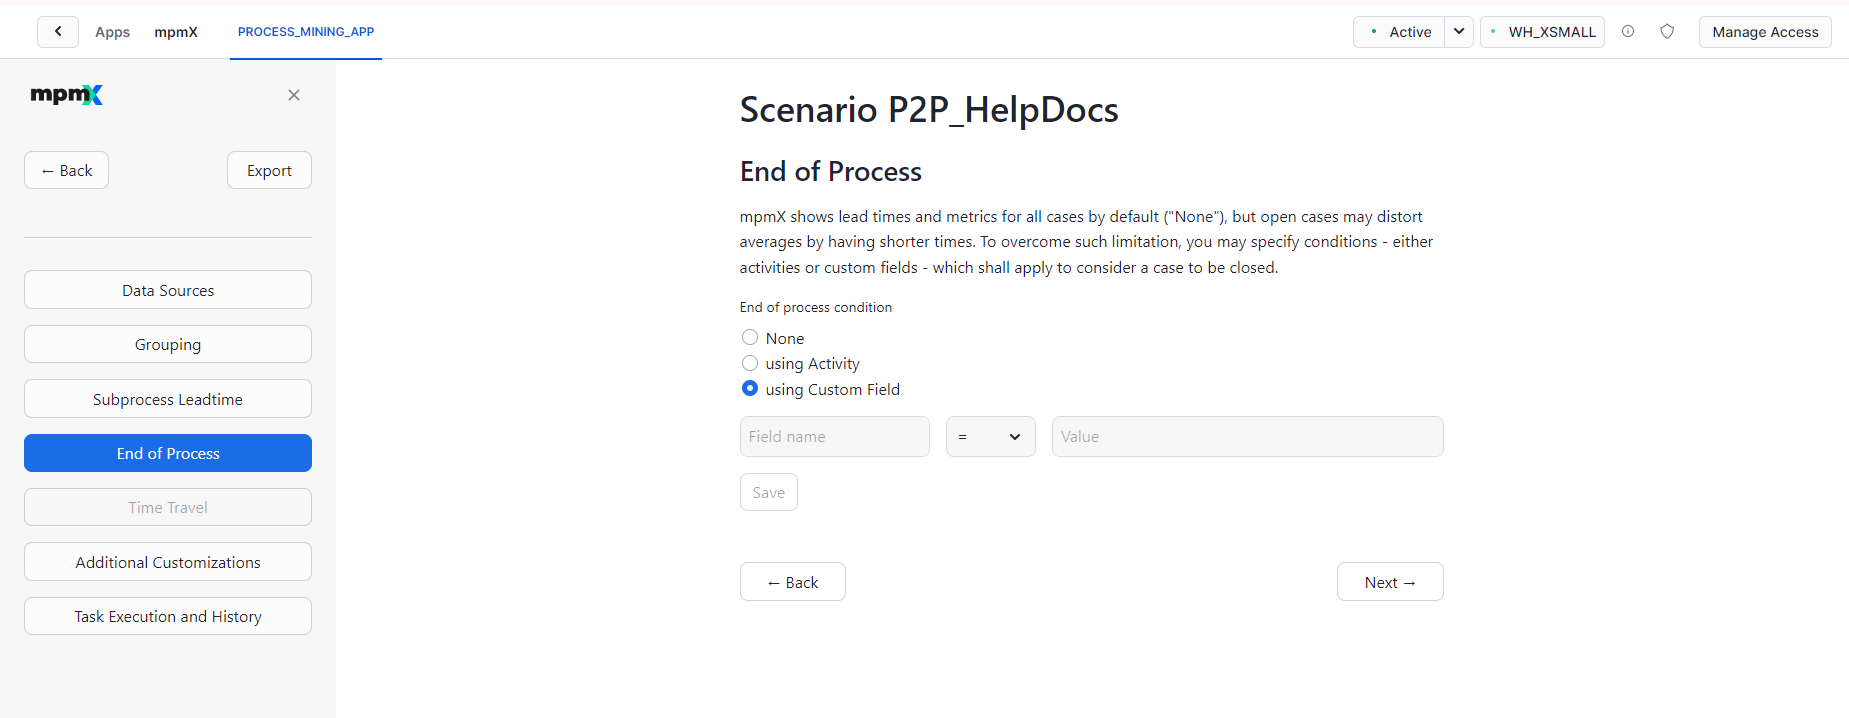
End of Process - using Custom Field
Don't forget to Save your changes.
Time Travel Tab
Time Travel allows you to keep advanced historical information to enable a more detailed analysis of changes over time.
Time Travel is only available for Snowflake Enterprise Edition accounts (and higher).
The Data Retention Time [d] field allows you to configure for how many days historical information should be retained. The maximum value is 90 days.
Please note, that this will result in additional storage costs.
Don't forget to Save your changes.
Additional Customizations Tab
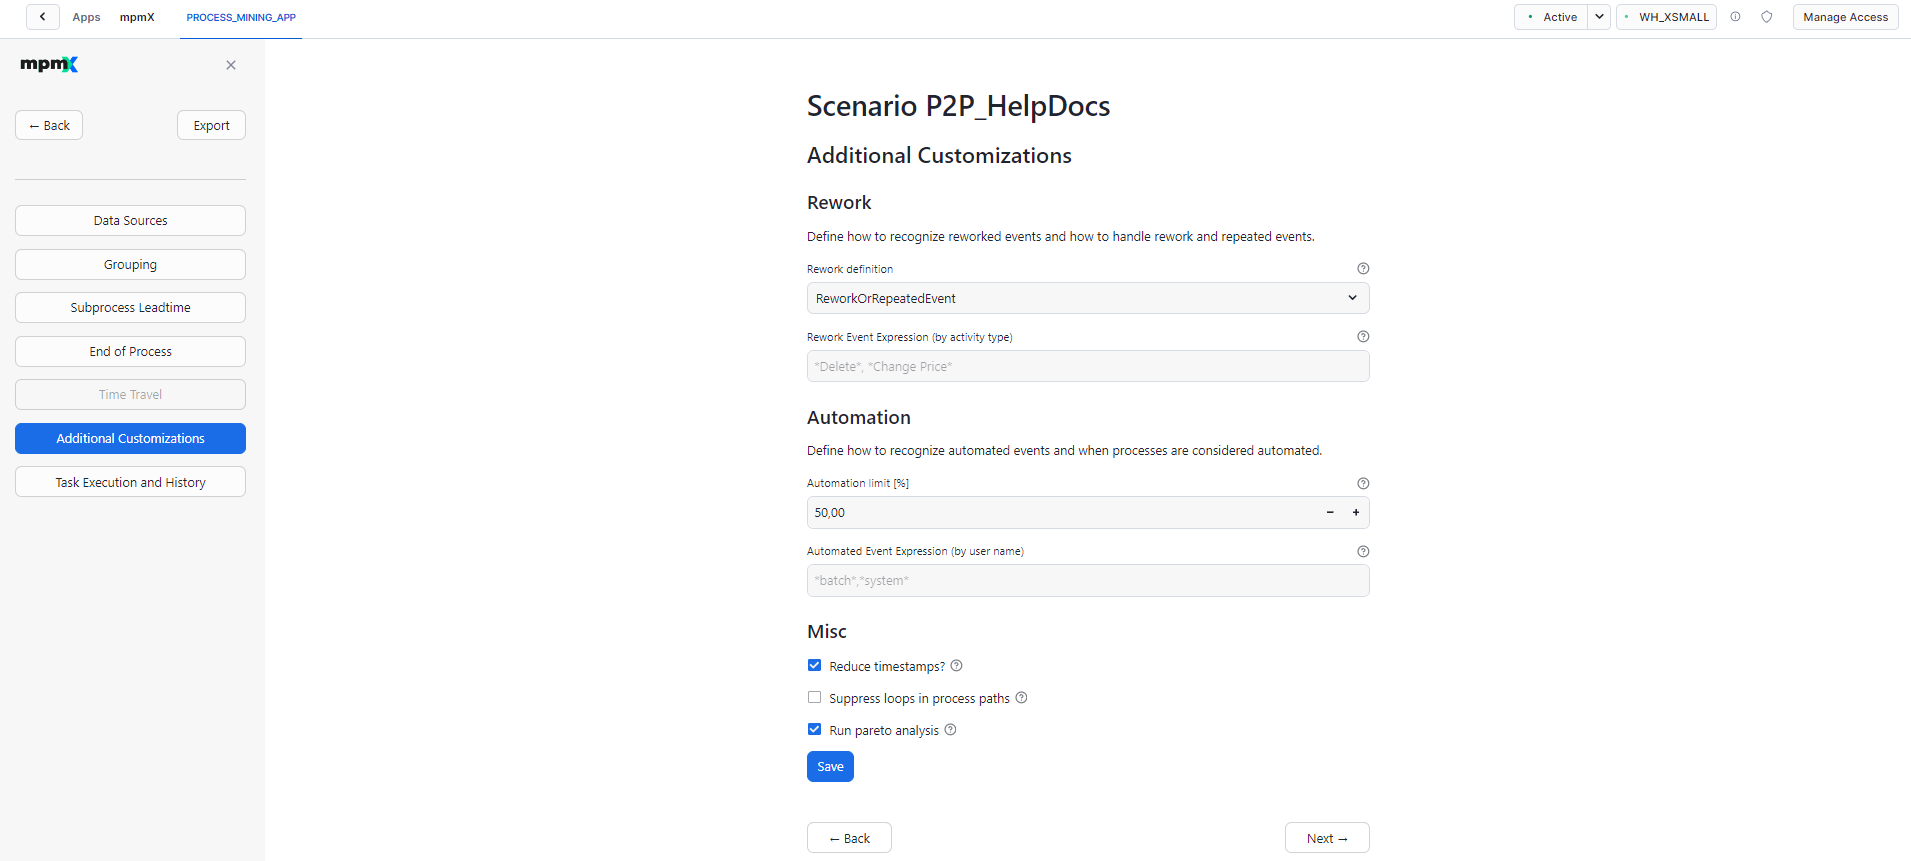
On the Additional Customizations screen you can configure some rework and automation settings as well as some miscellaneous settings.
Rework
A rework event is any activity that indicates an unexpected change, such as a Purchase Order being adjusted or deleted.
By selecting a Rework definition option you can define which kinds of events should be taken into account when calculating rework related measures. Options are
<empty>- rework related measures will not be calculatedReworkEvent- events are considered if they are defined as rework (see Rework Event Expression (by activity type) below)RepeatedEvent- events are considered if they are repeated in a loopReworkAndRepeatedEvent- events are considered if they are defined as rework AND are repeatedReworkOrRepeatedEvent- events are considered if they are defined as rework OR are repeated
An event is regarded as rework if its activity type matches the Rework Event Expression (by activity type).
Automation
- The Automation limit [%] indicates the percentage of automated events that a case needs to have to be labeled as an automated case.
- An event is regarded as automated if its user name field matches the Automated Event Expression (by user name).
Miscellaneous
- If Reduce timestamps? is checked, the number of distinct timestamps is reduced by flooring seconds and milliseconds to minutes. The lead and process times are not influenced, just the final timestamp output format is shortened to minutes.
- If Suppress loops in process paths? is checked, process variants are considered equal if they only differ in how often an activity occurs in succession. All repetitions are kept in the event log but there will be fewer distinct variants.
- Check Run pareto analysis to enable Pareto/ABC Analysis.
- Don't forget to Save your changes.
Conformance Checking Tab
Conformance Checking is an optional module in mpmX and will unlock the analysis in the Conformance sheet.
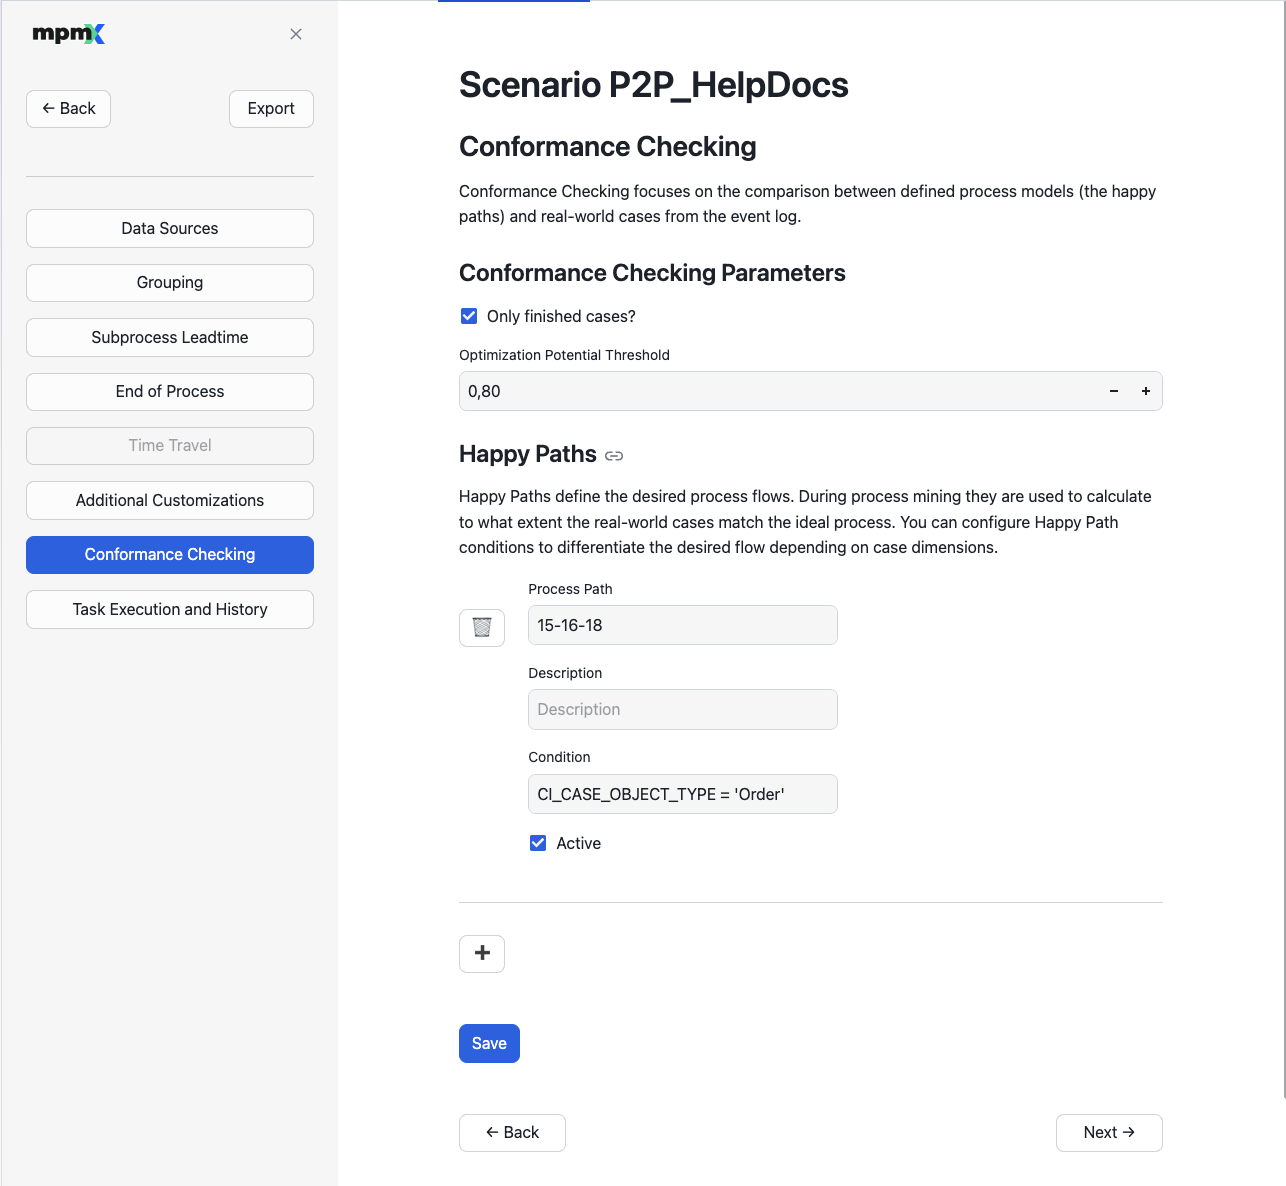
On the Conformance Checking screen you can define your Happy Paths, or ideal process paths, as well as configure other mining related settings.
Conformance Checking Parameters
- Use the Only finished cases? field to control whether only finished cases should be regarded or not.
- The Optimization Potential Threshold field defines which cases will be analyzed for process governance optimization potential by comparing the happy path fitness of the case to the specified threshold.
- Don't forget to Save your changes.
Happy Paths
This is where you define your happy paths.
To add a new happy path, click the "➕" button and fill out the fields appropriately.
- The Process Path field contains the ideal process paths.
- Use the Description field to describe what the happy path represents.
- The Condition field is used to limit the cases the happy path is checked against.
- If Active is checked, then this happy path will be used in the process mining.
To edit an existing happy path, simply change the field values as required.
To delete an existing happy path, click the "🗑️" button next to the happy path.
Click the blue "Save" button when you are finished.
Task Execution and History Tab
Task Execution Scheduling
-
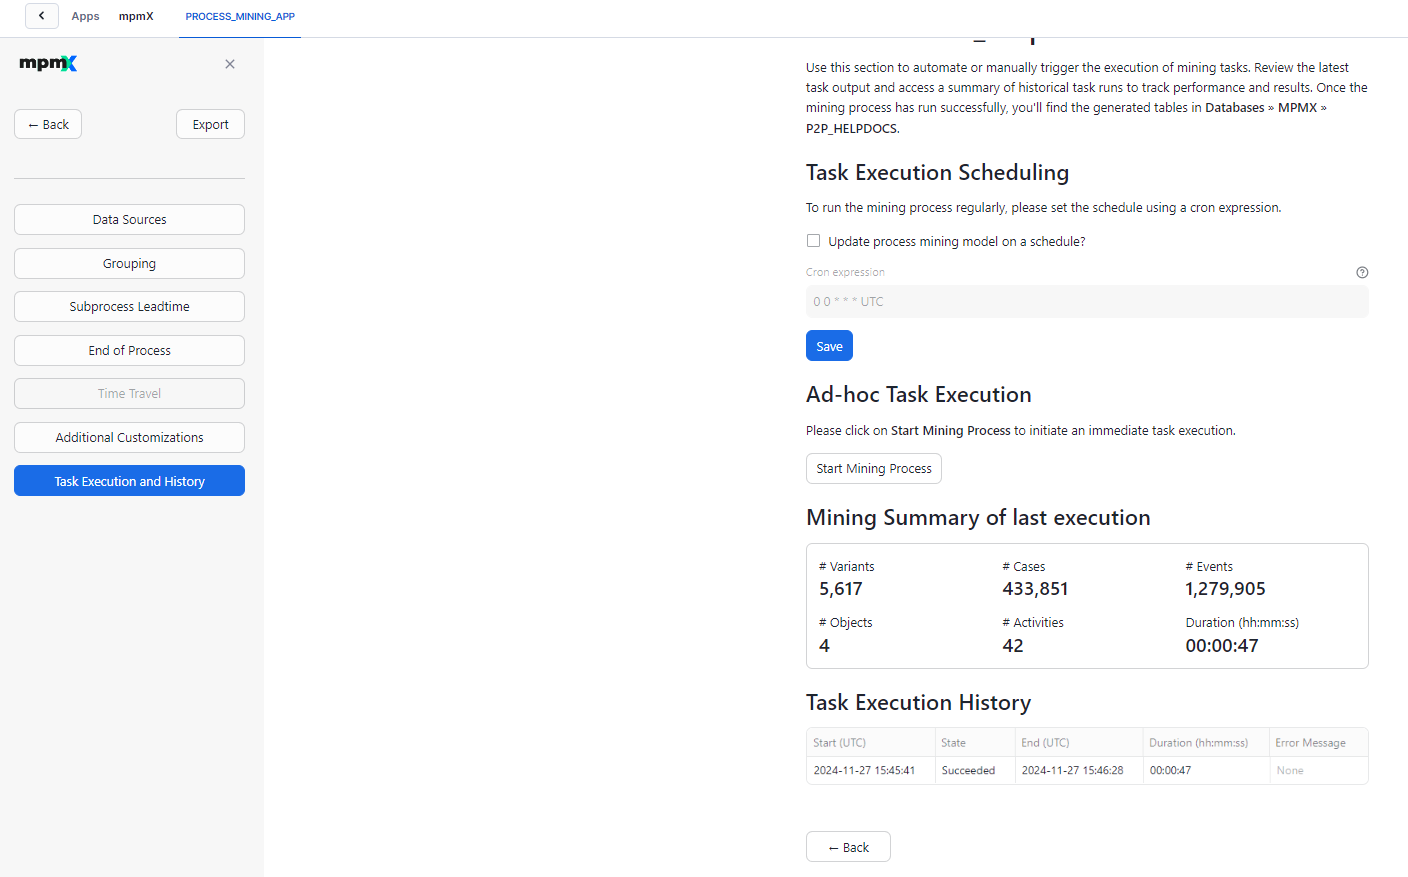
This section allows you to configure a schedule for regular automatic process mining runs by defining a Cron expression and a time zone. To understand how a cron expression is structured, please refer to the Snowflake documentation: Snowflake » Schedule using cron »
SCHEDULE ...»USING CRON <expr> <time_zone> -
Don't forget to Save your changes.
Ad-hoc Task Execution
- The Start Mining Process button allows you to manually start a process mining task.
Mining Summary of last execution
- This section shows the basic KPIs of the process model after a successful mining run.
Task Execution History
The Task Execution History section displays the status of the most recent process mining runs.
- The Start (UTC) and End (UTC) columns contain the start and end timestamps of the mining run
- Duration (hh:mm:ss) contains the total time of the mining run.
- The States column contains one of the following values:
- Running - The process mining task is running.
- Failed - The process mining task has failed. Error details can be found in the Error Mesage column.
- Succeeded - The process mining task was successful.
- Scheduled - The process mining task is scheduled to run at the displayed Start (UTC) time.
- An Error Message will appear if anything went wrong.