How to Create an Event Log for OCPM
There are some main differences bewteen traditional and object-centric mining, that need to be kept in mind, when creating an event log for object-centric Process Mining.
Main differences between traditional and object-centric Event Log
The main differences between the traditional event log and the object-centric event log are:
-
One process can have several objects, which bring their own type of CaseID. Hence, the CaseID is no longer one common identifier for the process instance to which all events are related but the identifier for the object itself, which caused the event to happen. For this reason, the former process instance is now captured in the new field Link in the CaseInformation table, while the object ID is captured in the field CaseID. To decide which CaseID belongs to which type of object, a new field ObjectType is implemented.
-
To see the interaction of objects in the ProcessAnalyzer some key activities are used as touchpoints, which means that an activity which originates from one object, is also shown in the process flow of another object.
Example:
Items are packed into one package. In this case the touchpoint activity between the item and the package object could be "pack item", which originates from the item object but is also used in the package object to reflect the interaction or better said touchpoint between the two objects. The new field PrincipalObjectType has been implemented to keep the information from which object an activity was originally caused. -
To keep the information from which source an event stems, the field ActivityOriginID is now obligatory. Furthermore, by tracking this information the counts on number of events are always correct when referring to this unique event identifier. Most important is the correct use of the ActivityOriginID when the activities are used as touchpoints. Here, the ActivityOriginID is the same ID when used in different objects, to prevent duplicates when counting or analyzing events.
The following table shows the new fields and their purpose.
| Link | CaseID | ObjectType | ActivityType | PrincipalObjectType | ActivityOriginID | ActivityStartTimestamp |
|---|---|---|---|---|---|---|
| 100 | 10010 | Item | Pick Item | Item | 10010_pick | 04.04.2022 10:01:02 |
| 100 | 10010 | Item | Pack Item | Item | 10010_pack | 04.04.2022 10:05:32 |
| 100 | 10020 | Item | Pick Item | Item | 10020_pick | 04.04.2022 10:03:44 |
| 100 | 10020 | Item | Pack Item | Item | 10020_pack | 04.04.2022 10:06:21 |
| 100 | 20010 | Package | Create Package | Package | 20010_create | 04.04.2022 10:04:45 |
| 100 | 20010 | Package | Pack Item | Item | 10010_pack | 04.04.2022 10:05:32 |
| 100 | 20010 | Package | Pack Item | Item | 10020_pack | 04.04.2022 10:06:21 |
| 100 | 20010 | Package | Send Package | Package | 20010_send | 04.04.2022 10:12:23 |
We see three different CaseIDs, which come from two Item objects and one Package object.
The three objects are related via the Link field, which contains in this example the customer order ID. The field ObjectType holds the information of the object type for the CaseIDs. The ActivityType and ActivityStartTimestamp fields are well known.
Finally, the purpose of the PrincipalObjectType and the field ActivityOriginID become clear when you take a closer look at the emphasized cells:
The two Pack Item events from the Items 10010 and 10020 are repeated in the Package object 20010. The PrincipalObjectType of this activity is always Item because we want to make clear that these Pack Item events are touchpoints between the Item and the Package, and that the Package did not cause the event.
Also, the ActivityOriginID is the same for the event Pack Item when used in the Item process flow and in the Package process flow. This prevents erroneous event counts as the distinct ActivityOriginID always gives the correct number of events.
To sum up: for OCPM four new (now obligatory) fields are required:
- ObjectType
- PrincipalObjectType
- ActivityOriginID
- Link
Creating an Object Centric Event Log
Given this information the creation of an object-centric event log is straight forward. We will show this with an example below. Imagine a purchase-to-pay process (P2P) including purchase orders, purchase order items, deliveries as well as invoices and payments. Every objects has its own process flow, with interactions / touchpoints to other objects. The touchpoints are marked in italic.
- The purchase order is created, released and closed with the last order-related payment and the last item-related delivery.
- The purchase order item is created and may have price or quantity changes. It has touchpoints with the order when the order is created, with the delivery, when goods are receipt.
- The delivery document is created, a goods receipt is created upon delivery, and the delivery document is closed.
- The invoice document is received and booked and closed with the last invoice-related payment.
- The payment is scheduled and carried out.
Example: Object Centric Event Log
To create the object-centric event log we recommend to follow these steps:
-
Create the event log for every object on its own without touchpoint events at first. Add the ObjectType, the PrincipalObjectType field, and the ActivityOriginID to the event log table. The PrincipalObjectType equals the ObjectType as long as the event is not a touchpoint to another object. It should look like this:
CaseID ObjectType PrincipalObjectType ActivityType ActivityOriginID ActivityStartTimestamp ActivityEndTimestamp 1000 Purchase Order Purchase Order Order Created 1000_orderCreated 0205.2022 11:55:01 02.05.2022 11:58:41 1000 Purchase Order Purchase Order Order Released 1000_orderReleased 03.05.2022 14:15:08 03.05.2022 14:16:58 2000 Purchase Order Purchase Order Order Created 2000_orderCreated 03.05.2022 14:15:08 03.05.2022 14:16:58 CaseID ObjectType PrincipalObjectType ActivityType ActivityOriginID ActivityStartTimestamp ActivityEndTimestamp 100010 Order Item Order Item Item Created 100010_itemCreated 05.05.2022 14:15:01 05.05.2022 14:17:51 100010 Order Item Order Item Change Price 100010_changePrice 05.05.2022 18:15:08 05.05.2022 18:15:18 100020 Order Item Order Item Item Created 100020_itemCreated 05.05.2022 14:15:01 05.05.2022 14:17:51 CaseID ObjectType PrincipalObjectType ActivityType ActivityOriginID ActivityStartTimestamp ActivityEndTimestamp 4000101 Delivery Delivery Delivery Doc Created 4000101_docCreated 08.05.2022 14:15:01 08.05.2022 14:17:51 4000101 Delivery Delivery Goods Receipt 4000101_goodsReceipt 09.05.2022 18:15:08 09.05.2022 18:15:18 4000102 Delivery Delivery Delivery Doc Created 4000102_docCreated 09.05.2022 14:15:01 09.05.2022 14:17:51 4000102 Delivery Delivery Goods Receipt 4000102_goodsReceipt 10.05.2022 18:15:08 10.05.2022 18:15:18 CaseID ObjectType PrincipalObjectType ActivityType ActivityOriginID ActivityStartTimestamp ActivityEndTimestamp 5000101 Invoice Invoice Invoice Receipt 5000101_invReceipt 09.05.2022 18:16:08 09.05.2022 18:16:18 5000101 Invoice Invoice Invoice Booked 5000101_invBooked 10.05.2022 18:15:08 10.05.2022 18:15:18 5000102 Invoice Invoice Invoice Receipt 5000102_invReceipt 10.05.2022 18:16:08 10.05.2022 18:16:18 5000102 Invoice Invoice Invoice Booked 5000102_invBooked 11.05.2022 18:15:08 11.05.2022 18:15:18 CaseID ObjectType PrincipalObjectType ActivityType ActivityOriginID ActivityStartTimestamp ActivityEndTimestamp 6000101 Payment Payment Payment Scheduled 6000101_payScheduled 10.05.2022 15:16:08 10.05.2022 15:16:18 6000101 Payment Payment Payment 6000101_payment 11.05.2022 16:15:08 11.05.2022 16:15:18 6000102 Payment Payment Payment Scheduled 6000102_payScheduled 11.05.2022 16:16:08 11.05.2022 16:16:18 6000102 Payment Payment Payment 6000102_payment 12.05.2022 17:15:08 12.05.2022 17:15:18 -
Create the CaseInformation table which contains the CaseID and add the link to every CaseID so that the objects become related to each other. How do you choose the Link level? We recommend taking the former traditional CaseID as the Link. In our P2P example this would be the purchase order ID. The CaseInformation table contains the case context information as you know from the traditional process mining approach.
CaseID Link CaseDimension1 CaseDimension2 CaseDimension3 CaseDimension4 CaseDimension5 1000 1000 - - - - - 2000 2000 - - - - - 100010 1000 - - - - - 100020 1000 - - - - - 4000101 1000 - - - - - 4000102 1000 - - - - - 5000101 1000 - - - - - 5000102 1000 - - - - - 6000101 1000 - - - - - 6000102 1000 - - - - - Having created the single objects event logs and the object links, the different logs can already be loaded to the mpmX Template App as one concatenated event log. Since the touchpoint between the objects are still missing, the ProcessAnalyzer would show the five objects without any interaction:
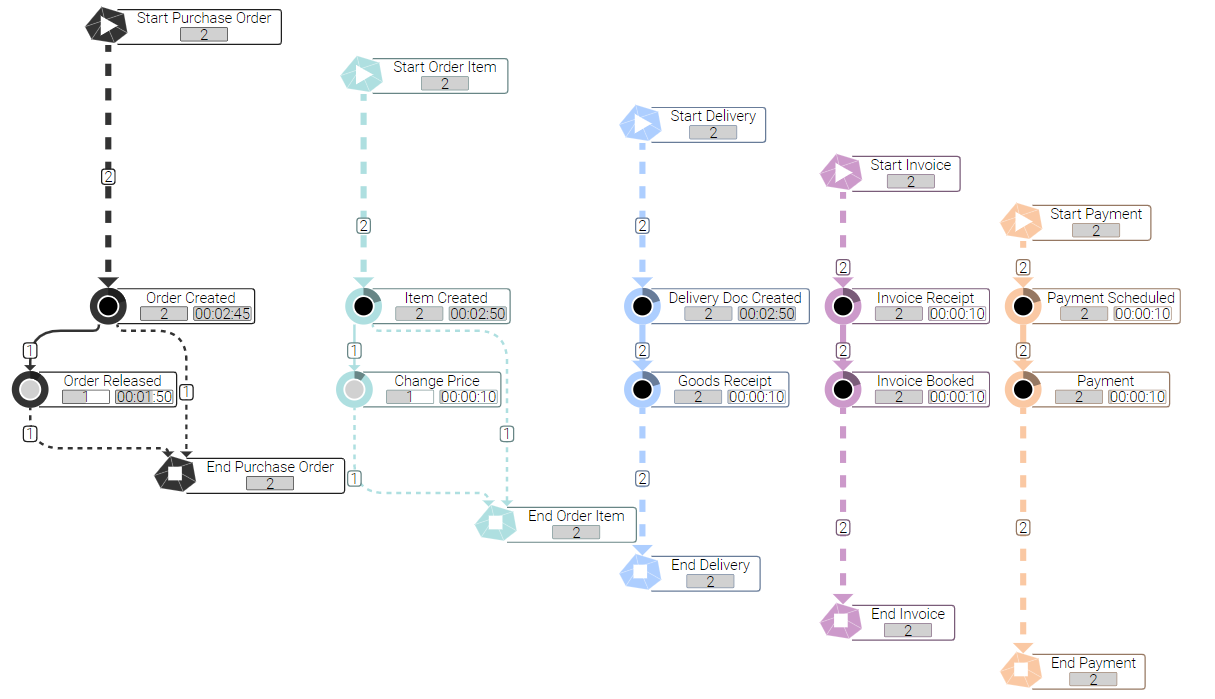
Simple Example of Creating an EventLog with no Touchpoints in the Process Analyzer for OCPM -
Create the touchpoints between the objects. You have several options here. We recommend you re-use events from other objects to create the interactions.
CaseID ObjectType PrincipalObjectType ActivityType ActivityOriginID ActivityStartTimestamp ActivityEndTimestamp 1000 Purchase Order Delivery Goods Receipt 4000102_goodsReceipt 10.05.2022 18:15:08 10.05.2022 18:15:18 1000 Purchase Order Payment Payment 6000102_payment 12.05.2022 17:15:08 12.05.2022 17:15:18 CaseID ObjectType PrincipalObjectType ActivityType ActivityOriginID ActivityStartTimestamp ActivityEndTimestamp 100010 Order Item Purchase Order Order Created 1000_orderCreated 02.05.2022 11:55:01 02.05.2022 11:58:41 100010 Order Item Delivery Goods Receipt 4000101_goodsReceipt 09.05.2022 18:15:08 09.05.2022 18:15:18 100020 Order Item Delivery Goods Receipt 4000102_goodsReceipt 10.05.2022 18:15:08 10.05.2022 18:15:18 CaseID ObjectType PrincipalObjectType ActivityType ActivityOriginID ActivityStartTimestamp ActivityEndTimestamp 5000101 Invoice Payment Payment 6000101_payment 11.05.2022 16:15:08 11.05.2022 16:15:18 5000102 Invoice Payment Payment 6000102_payment 12.05.2022 17:15:08 12.05.2022 17:15:18 100020 Order Item Delivery Goods Receipt 4000102_goodsReceipt 10.05.2022 18:15:08 10.05.2022 18:15:18 In general the selection / definition of touchpoints is up to the data engineer and the definition during the process mining project. Different touchpoint definitions may be helpful for different purposes. In case the objects are less kind of an object and more kind of a sub-process it may be feasible to create artificial start and end events for the subprocesses and add them as touchpoints to the parent process.
After modeling the touchpoints and concatenating them to the event logs from step 1, the ProcessAnalyzer shows this process flow:
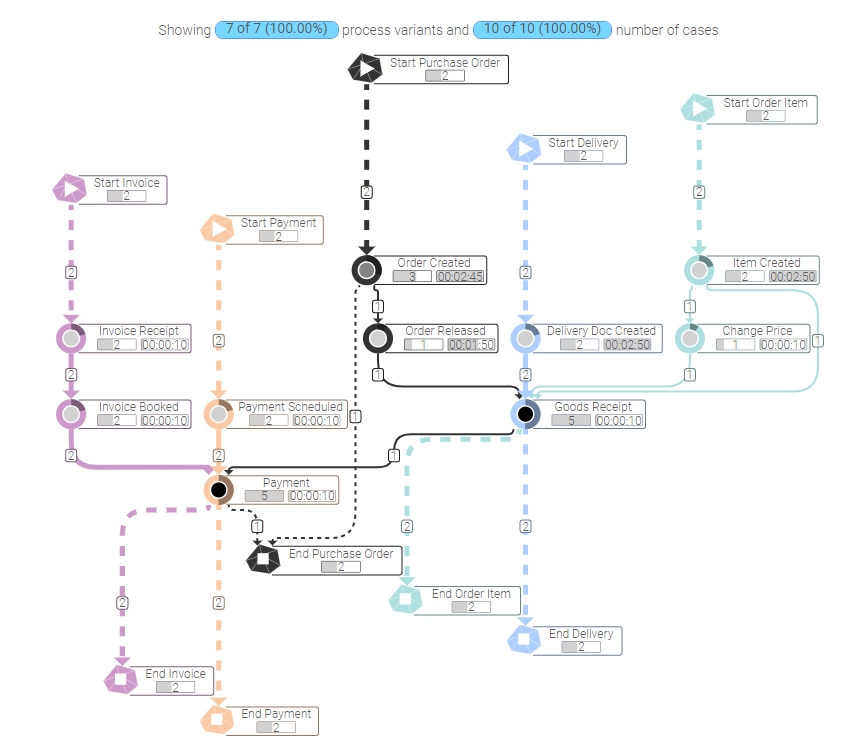
Simple Example of the Process Analyzer
💡 Note: In the next section How to Configure the mpmX Template App for OCPM (fast track), we will show you in a summed-up guide how to configure the mpmX Template App correctly for OCPM.